Brick Dinos - Plinths
Components:
18x plinths. Compete units of painted MDF plinth base, with model, interpretation and lights, all within a perspex hood.
Taller plinths:
Ankylosaurus
Archaeopteryx
Brachisaur
Brontosaurus Skeleton
Corythosaurus
Diplodocus
Palaeontological dig site diorama
Parasaurolophus
Pterodactyl
Sarcosuchus
Spinosaurus
Stegosaurus
Struthiomimus and Skeleton
T Rex
Triceratops
Shorter plinths:
Ammonite
Fossilised Ferns
Trilobite
Power cables (black box)
All stored individually, with a yellow strap, info card and ‘do not stack’ cone.
Set-up:
Please remember that these plinths are delicate. They MUST be moved using a hand-pump/pallet truck or very gently with a forklift truck. They CANNOT BE PUSHED into place at all. Doing so may cause damage to the ehxhibit and/or your floors, both may result in an awkward fix.
Once floorplan is agreed and power-access has been ascertained; move each plinth to its display location.
In parallel, each plinth should be condition-checked. The likeliest areas of concern are:
cracks/scratches in the perspex hoods
sections of the LEGO model falling over
damage to the painted MDF plinth
Connect a power cable to the Wieland connector under the plinth (this is accessible through the base of the plinth in the section between the metal fork pockets), ready for onward connection to the rest of the exhibition/power supply. Plinths can be daisy-chained in runs for connection to the power supply if there are limited sockets in the venue.
there are a mixture of cable lengths in the black plastic power box: 1m, 2m with 13A plug, 3m, 6m and some block connectors.
ensure that cables and connectors are counted in and out of the power box and any discrepancies notified to Warren Elsmore Ltd.
Put the drop-down skirt into place, by disengaging each of the pull-locks and letting it drop down. Ensure that it is all the way down on all sides of the plinth.
ensure that the power cable is plugged in and turned on BEFORE you drop the skirt IF the power floorbox is located directly under the plinth.
ensure that the power cable is protruding from the skirt in the correct orientation if the power is not located directly under the plinth.
Check that the lights inside the plinth light up when the power is connected.
Venue are responsible for other lighting.
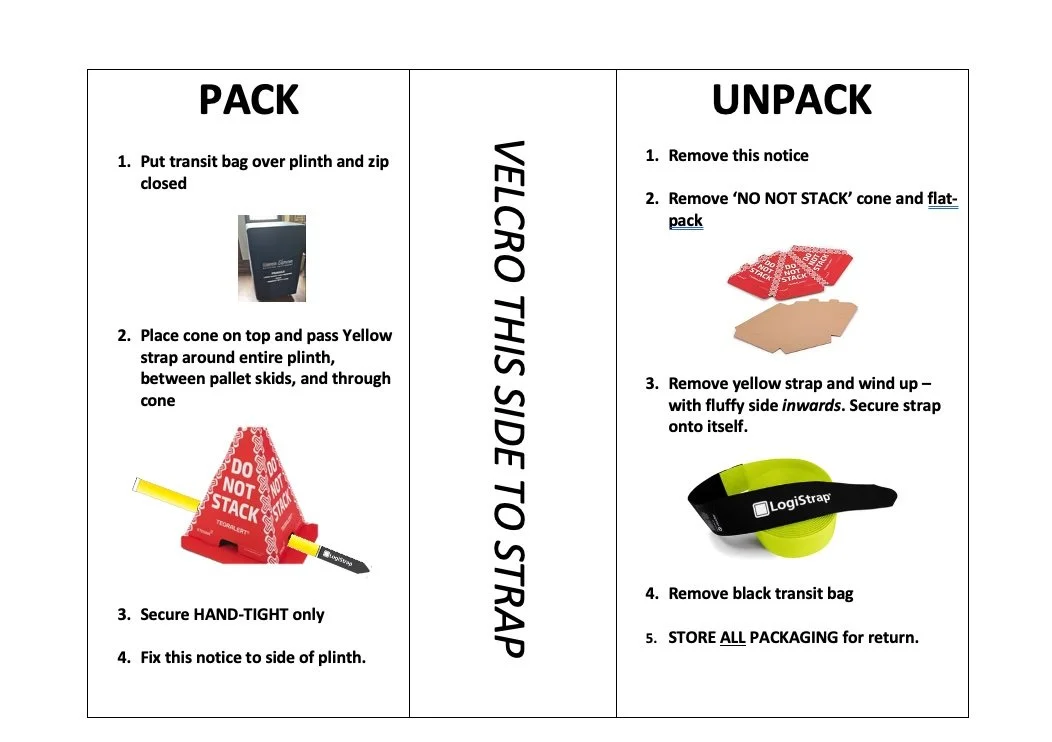
Zip-up and carefully fold the plinths’ transit bags and store them in one of the transit cases which are being used for storage.
Tidy for storage the velcro strap, Do NOT Stack cone and instruction sheet and store them in one of the transit cases being used for storage.
Do this according to the instruction sheet attached to the velcro strap. (As shown in images below):
Other notes:
Refer to this post on how to safely move the plinths in places where they can not be wheeled safely.